Picturs of Things That Are Made of Lumber From the Amazon Pritty and Easy Drawlings
How to build beautiful easy DIY bed frame & wood headboard, $1500 look for $100! Best tips & free plans for king, queen & full bedframes!
A DIY bed frame sounded so awesome and SO SCARY to me, for a long time. Finally, we did it! This simple DIY wood bed frame is inspired by some of the $1000 – $2000+ beautiful wooden bed frame and platform bed designs from places like West Elm and Pottery Barn which we love.
SO, what does it take? One weekend, $100, and a few simple tools most beginner DIY enthusiasts have!
The detailed DIY bed step by step tutorial will cover:
- how to build a modern bed frame without need for box spring, and is easy to disassemble when moving
- how to adapt the DIY bed frame and headboard free building plan to any size bed ( king bed to twin bed, with or without headboard)
- the best natural finishes for your wood bed frame and headboard. ( Some of the helpful resources are affiliate links. Full disclosure here. )
* Some resources in article are affiliate links. Full disclosure here .
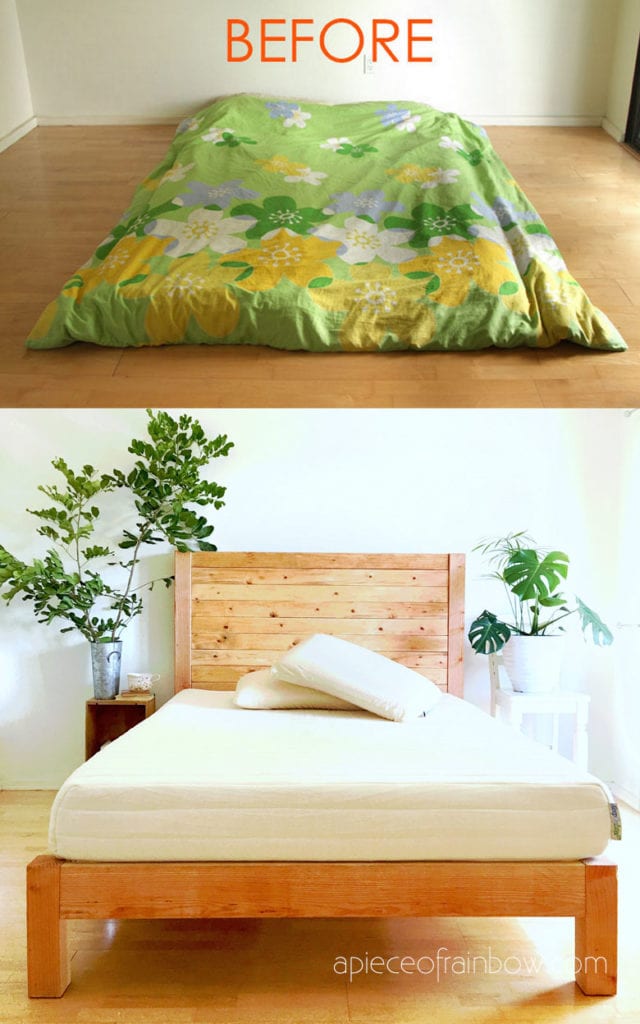
Last summer, inspired by this amazing book: The Life-changing Magic of Tidying Up, we decided to embark on an epic decluttering of everything, the first things we let go of were our huge mattresses and box-springs. Oops! So we just spent an entire year sleeping on the floor.

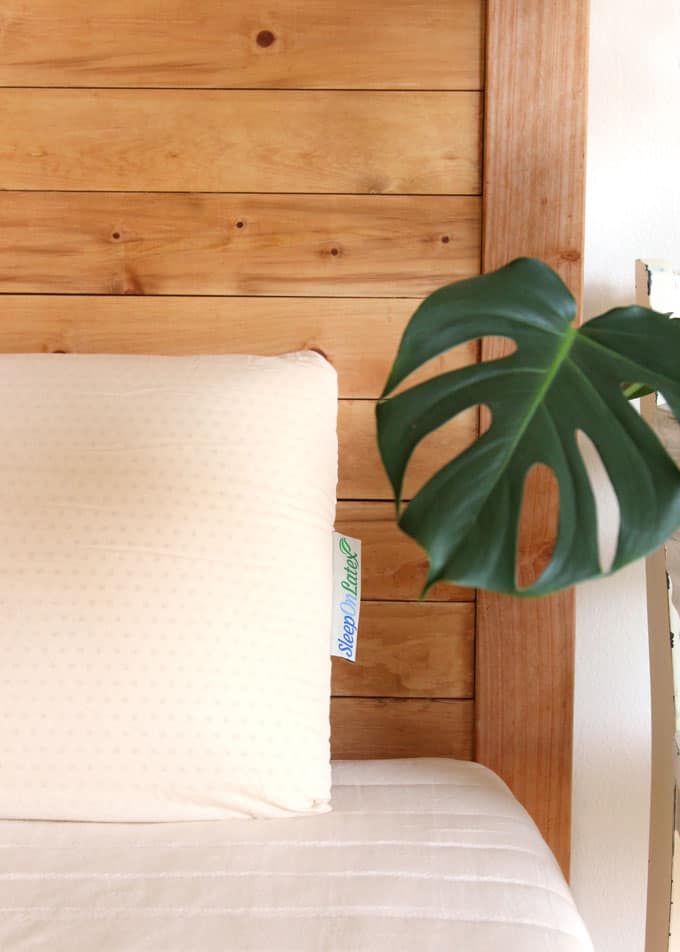
When I shared my DIY bed frame idea with our dream mattress company Sleep On Latex, they generously sent us some amazing gifts to support our DIY project : a heavenly mattress made of 100% natural latex foam, certified organic cotton and organic New Zealand Wool! Plus two luscious latex pillows!
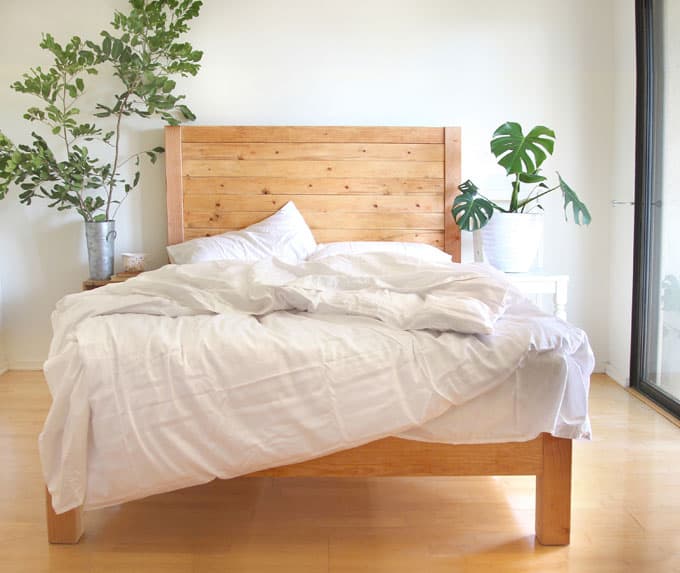
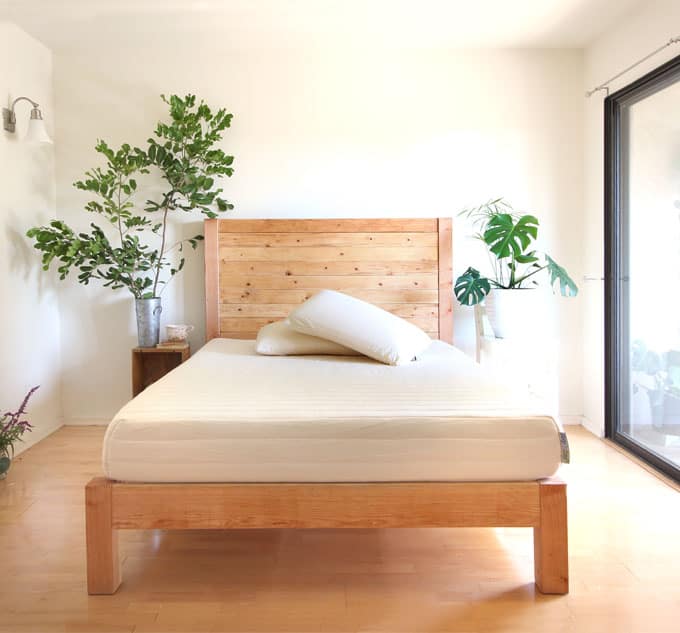
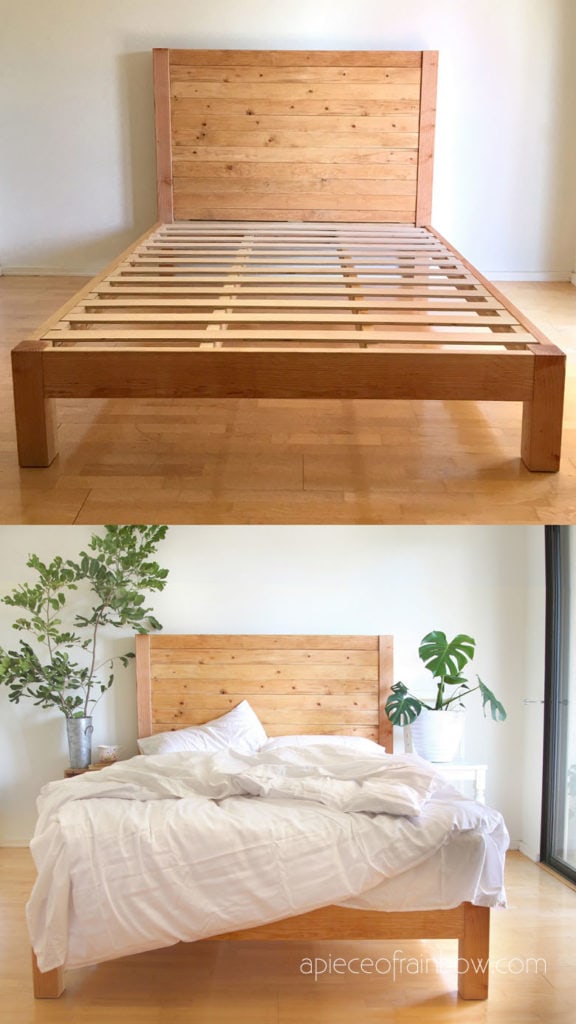
Hubby is always super supportive. This time, he is not only supportive, but beyond excited about how surprisingly easy it was to build this bed and how much he, a born perfectionist, loves our new, sturdy, gorgeous DIY bed! This wooden bed would look beautiful in any home from modern to farmhouse style.
Step 1: Choose the right wood to build a bed frame ( very important!! )
Do NOT use pressure treated lumber, there might be chemicals in them that you don't want! If you use reclaimed wood, make sure they are clean and safe to use!
To build a wood bed frame that is beautiful and sturdy, we need to choose wood for strength, work-ability and beauty. Select wood with structural integrity, tight grain, small knots , few cup and twist, and no splits.
Knots are very dense, making them hard to drill and cut through. Study the plan to see where the screws are, and select boards with few knots in those areas.
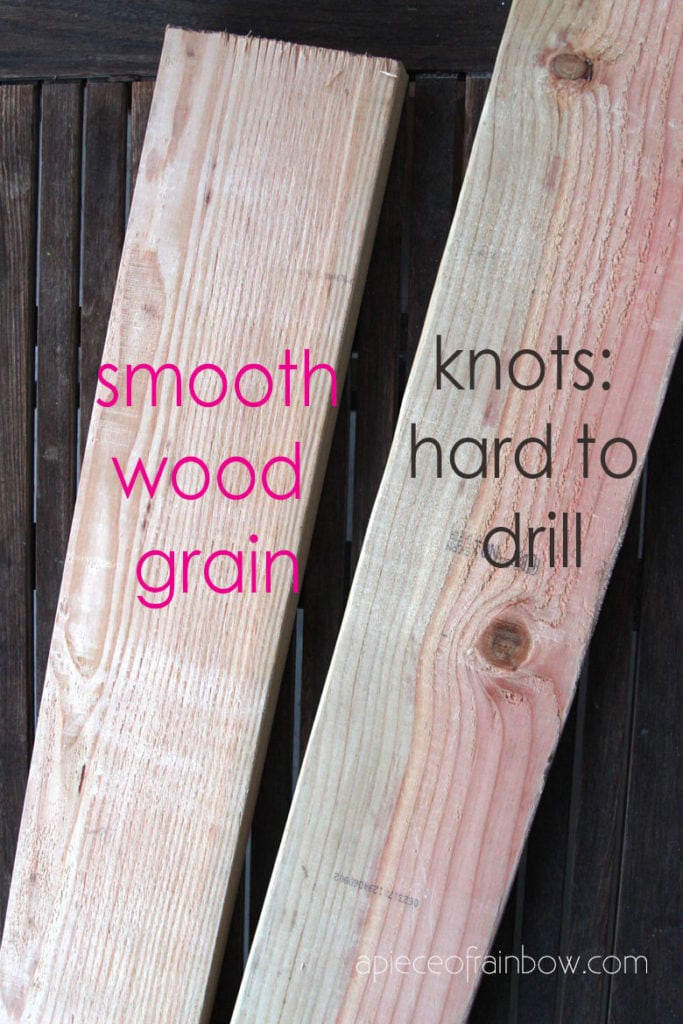
We used Douglas Fir for our DIY wood bed posts and rails. It is a popular structural/construction lumber on the west coast. The wood is very stiff and strong. Southern Yellow Pine / Spruce Fir is also a great choice and popular on the east coast. Other great choices are Poplar, Ash, Oak, Alder, Birch, Cherry, Walnut, and Maple.
If you are using other species of lumber, make sure that the wood is good for structural use. Don't just base on the name 'hardwood' or 'softwood'. An example about hardwood vs softwood: Doug Fir is a softwood that is super strong, while Basswood, a hardwood, is super soft and will not hold the screws, which means a bed frame that will fall apart!
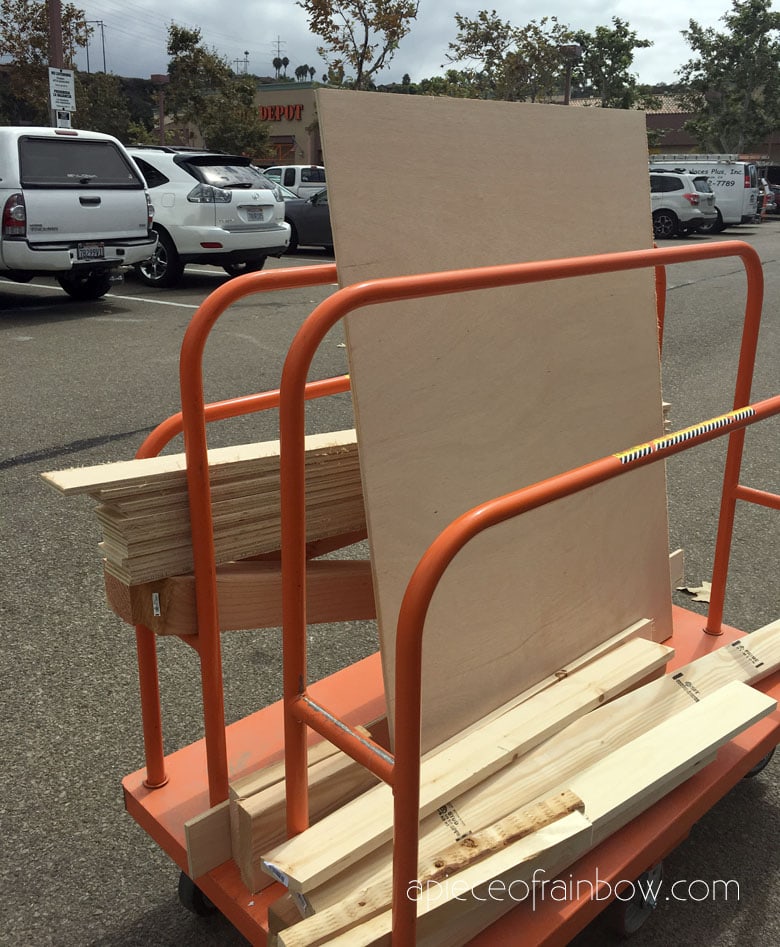
Step 2: gather materials and tools for your bed frame project
When we showed our DIY bed frame plan to a nice Home Depot employee, he got so excited for us, and cut most of the wood for us with great care, which made it so much easier! Take the plans and cut list with you ! 🙂 Some of our resource links are affiliate links, see full disclosure here.
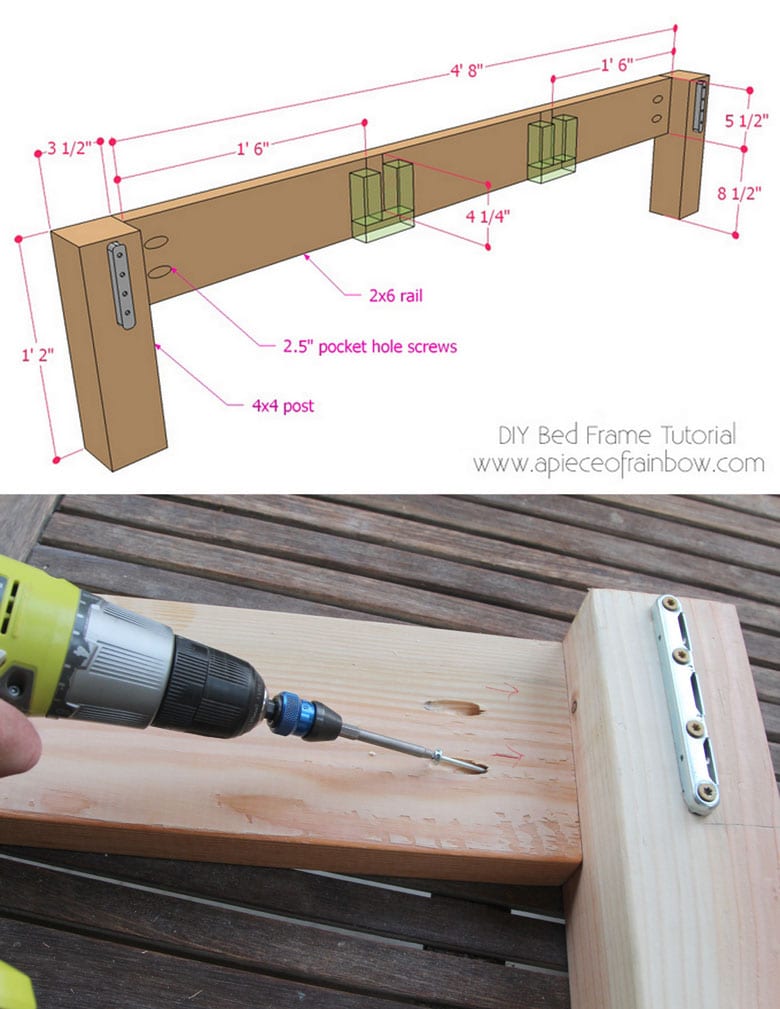
4×4 posts: (2) 4×4 @ 1'2″ L, (2) 4×4 @ 4'6″ L {NOTE: the plans show these two posts on the headboard at 4'5″, but an extra inch gives more flexibility when you layout the headboard} , cut from (1) 4×4 @ 12′
2×6 rails: (2) 2×6 @ 4'8″, (2) 2×6 @ 6'6″, cut from (2) 2×6 @ 12′ ( Some readers asked about using 1×6 or 1×8. They tend to warp, especially at a long length. Look up local lumberyard, they usually carry more varieties than hardware stores! if not, maybe glue 2 pieces of 1x6s instead!
2x4s : (2) 2×4 stringers @ 6'8″, (1) 2×4 @ 4'8 for top of headboard, cut from (1) 2×4 @ 8′, and (1) 2×4 @ 12′
1x4s : (10) 1×4 @ 4'8″, (3) 1×4 @ 2'11.5″, cut from (6) 1×4 @ 10′

Plywood slats and spacers: (14) 3″ wide x 5′ long. We used PureBond 1/2″ thick plywood which is a great quality, formaldehyde-free plywood. The sheet is 4'x8′. Home Depot cut it to 4'x5′ first, then to 3″x5′ slats for us. We cut one of them into smaller spacers later.
Slat supports: (2) 2×2 @ 6'3, cut from (2) 2×2 @ 8′, save the extra to use for stringer supports
Please follow good practices to build safely and smartly. Follow safety guidelines for each tool. Work on a clean level surface, free of clutter or debris. Always use straight boards. Always wear safety goggles and hearing protection. And remember to check for square after each step!
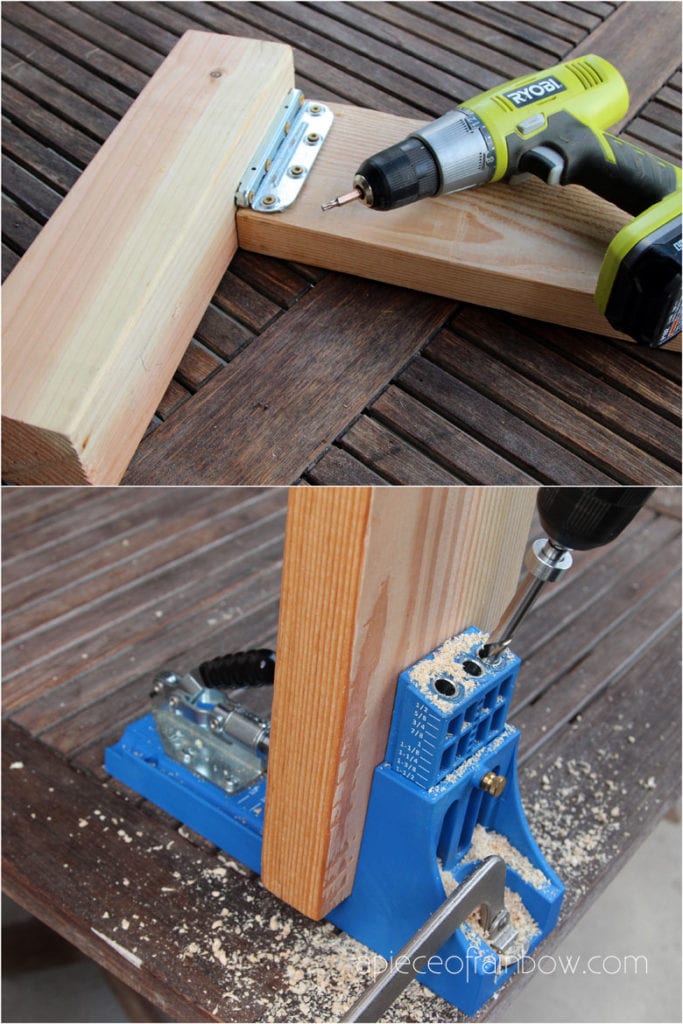
- Kreg Pocket Hole Jig: this one is a good starter Kreg jig, use it with a woodworking clamp, or this bigger set which has a built-in clamp, 1.25″ Pocket Hole screws and 2.5″ Pocket Hole screws
- Bed rail brackets : Our DIY bed frame can be easily assembled or disassembled when moving thanks to these awesome bed rail brackets! They don't come with instructions, so I have included detailed instructions on how to install these brackets. We used these 2 1/2″ screws ( use with star drill bit) and 1 1/4″ screws to attach the brackets to 4x4s and 2x6s.
- always use deck or structural wood screws that are strong and durable, like these which offer lots of length options. Length of screws should be at least 1/4″ to 1/2″ less than the total thickness of materials you are joining.
- Sand paper : I used 120 grit sand paper for sanding the cut surfaces, and 300 to 400 fine grit sand paper to sand the exposed wood surfaces. Tape measure, combination square, pencils for marking
- drill, circular saw or jig saw, safety goggles, dust mask, hearing protection. Follow safety procedures!!

IMPORTANT: after all the wood is cut, check the pieces together which have the same length: this will ensure our DIY bed frame is square and all the pieces fit nicely. Consistency is more important than numbers!
For example: all the 1x4s on the headboard should be the same length as the two 2x6s on the headboard and foot-board. It is OK if all of them are, let's say, 1/4″ less than what is written on the plan (this diy platform bed frame is forgiving if you are off by 1/2″ to 1″ ). It is NOT OK if some of them are 1/8″ more, and some are 1/8″ less than the 4'8″ on the plan.

Sand all the cut surfaces and exposed surfaces so the wood is nice and smooth. If you want to paint or stain the wood, now is a good time.
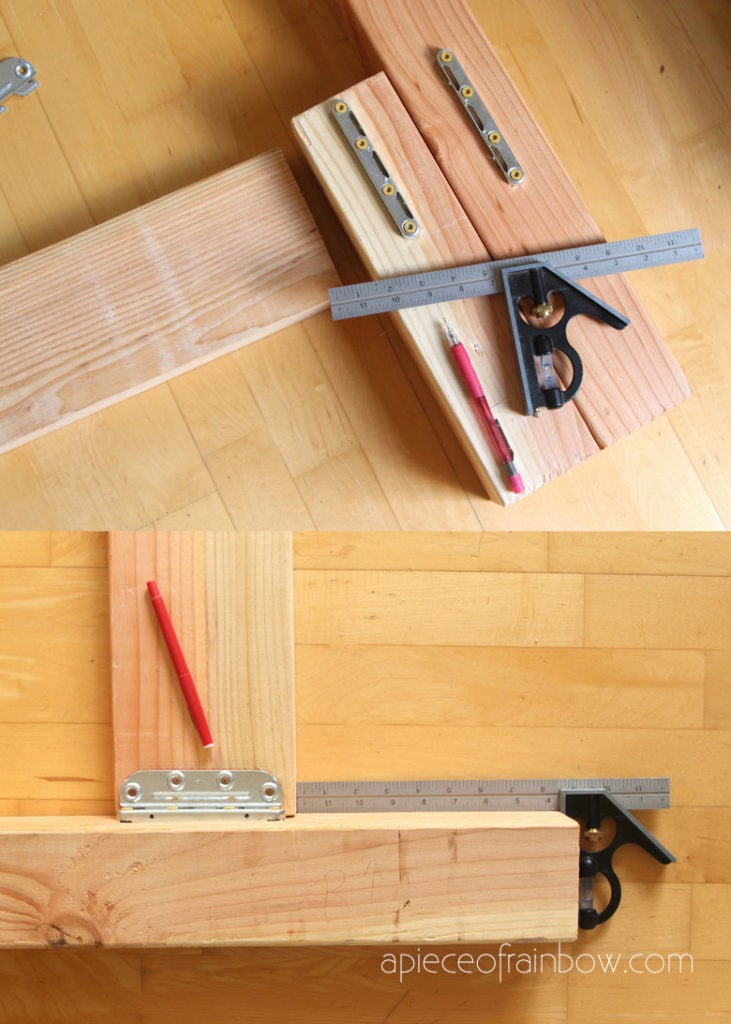
Step 3: How to install bed rail brackets
This important step is not difficult, but it requires patience and accuracy. If you do it right, the rest of the DIY bed frame is super easy! Let's see how to install bed rail brackets in detail.
These surface mount bed rail brackets come in 4 pairs. The brackets with the slots goes on the 4 bed posts, and the brackets with the "claws" goes on two 2×6 6'6″ long side rails, one on each end.
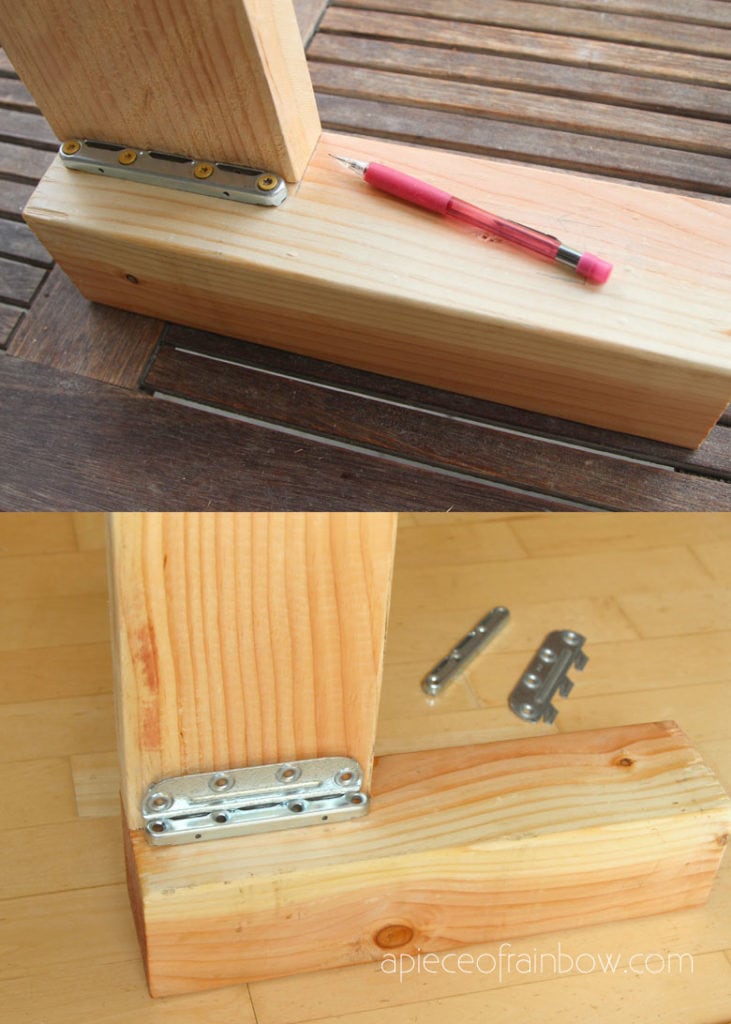
Set a 2×6 rail ( or use a smaller scrap piece of 2×6 ) on a foot-board post, the top of the rail should be flush with the top of the post. The end faces of the rail and post are touching when mounted.
Set the pair of brackets in a locked position onto the post and rail, and mark the outer edges of the brackets and each drill hole carefully.
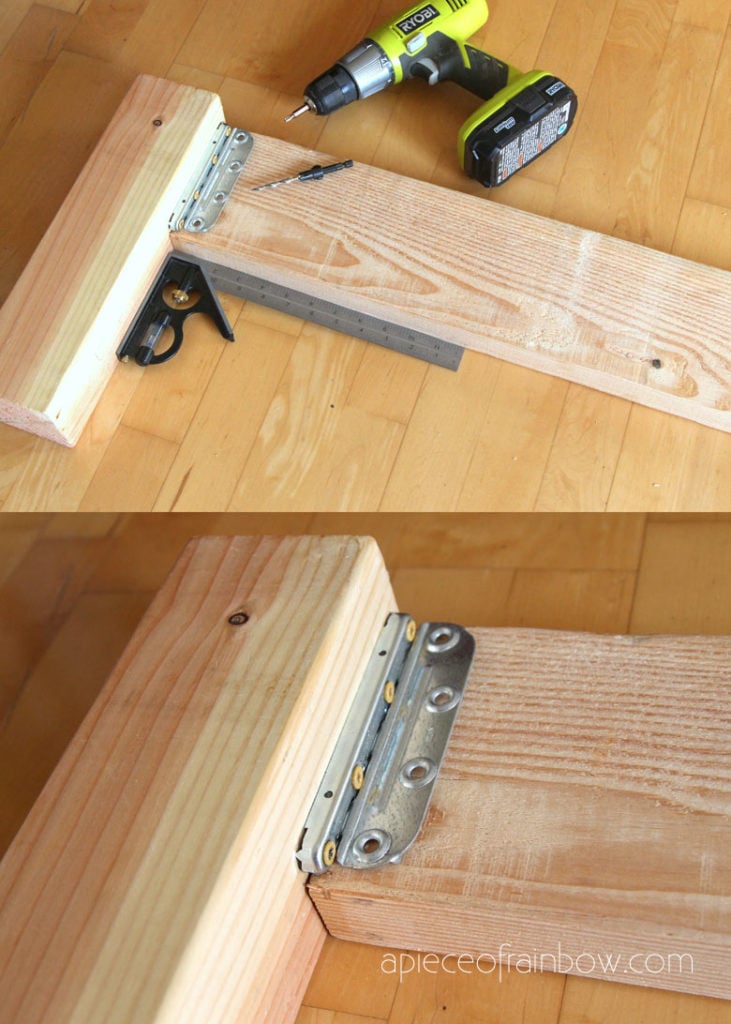
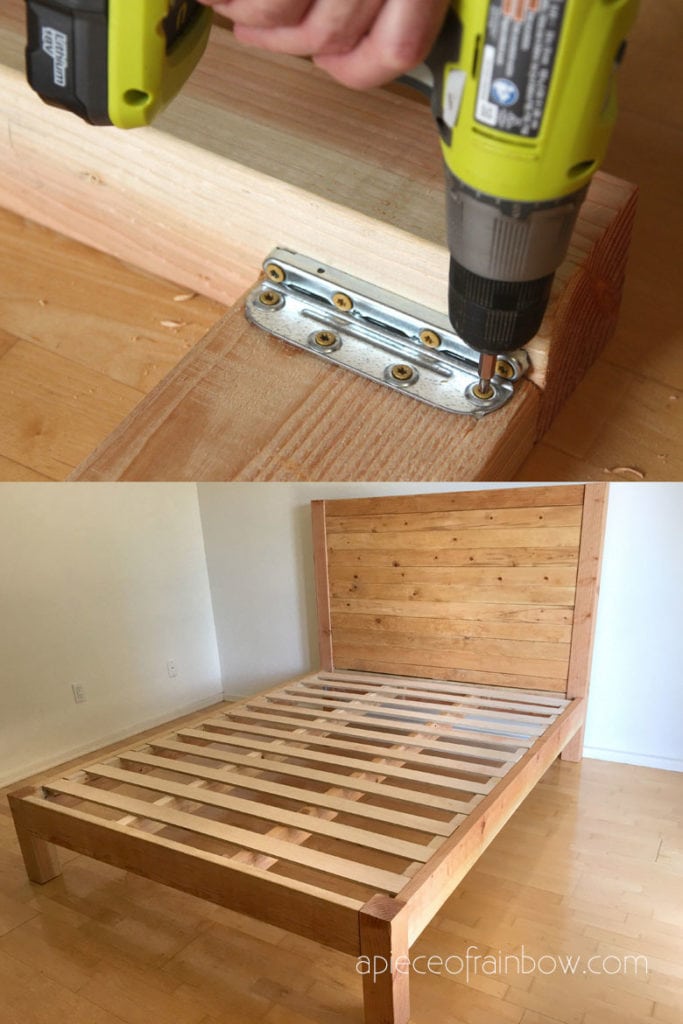
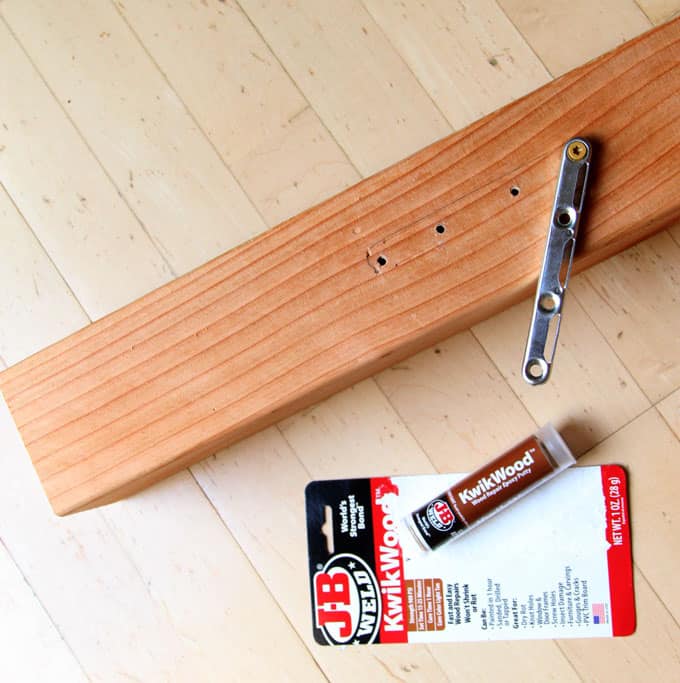
First, pre-drill each marked drill hole, and attach the slot bracket onto the 4×4 post using 2″ to 3″ long screws. If you are off, the rail will not be flush to the post. Remember to keep checking at each step! We used these 2 1/2″ screws ( use with star drill bit) to attach the brackets to the 4x4s.
This happened to us once. We filled the drill holes with JB Weld wood putty and redid it.
Next, attach the "claw" bracket to one end of the rail, check everything is square and flush. We used 1 1/4″ screws to attach the brackets to the 2x6s.
Don't tighten the screws too much on the "claw" brackets yet. At this stage, we want to easily hook and unhook these brackets. In the final step when we get the brackets hooked together, we will tighten the screws so the bed is rock solid!
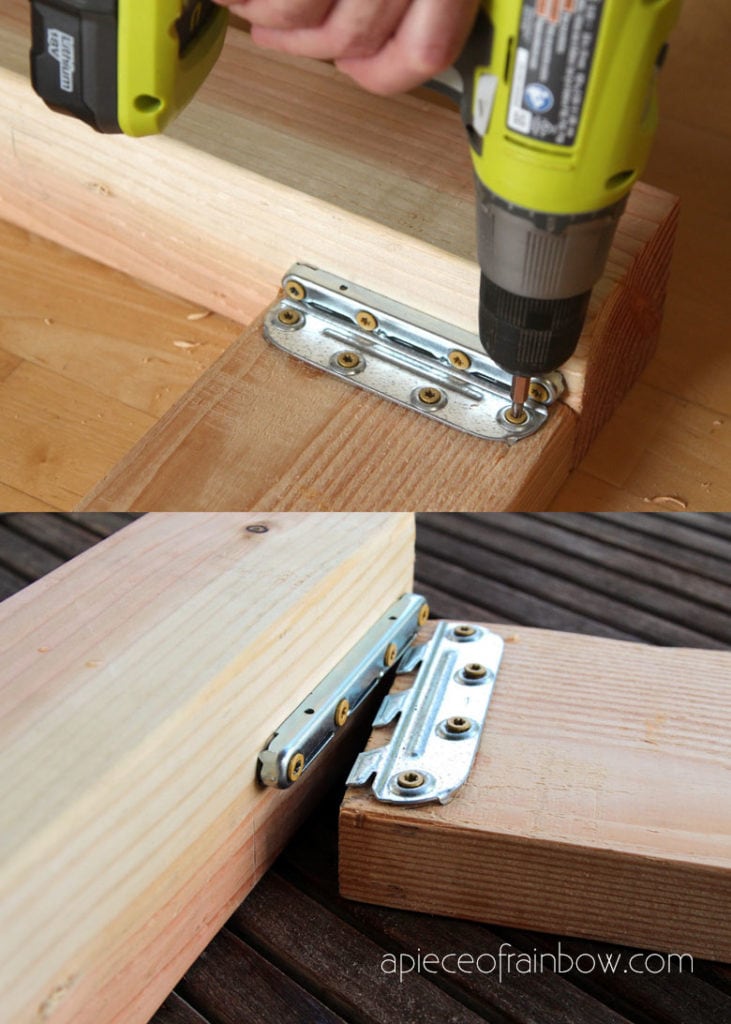
Repeat this process until you installed all the brackets. Keep checking to make sure everything is lined up accurately in all dimensions: height, width, and depth.
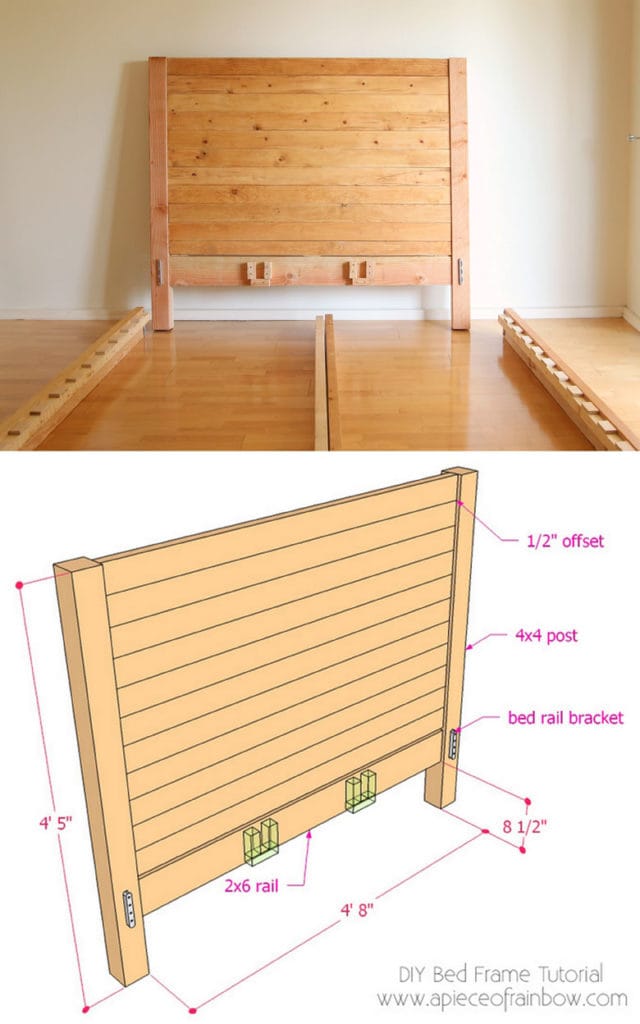
Step 4: build wood bed and headboard
Tip: It is easier to drill all the pocket holes first, then screw the pieces together.
When building the headboard, create the center panel first, then attach it to the posts, and then add 2×4 top piece and 2×6 bottom rail. See diagram below.
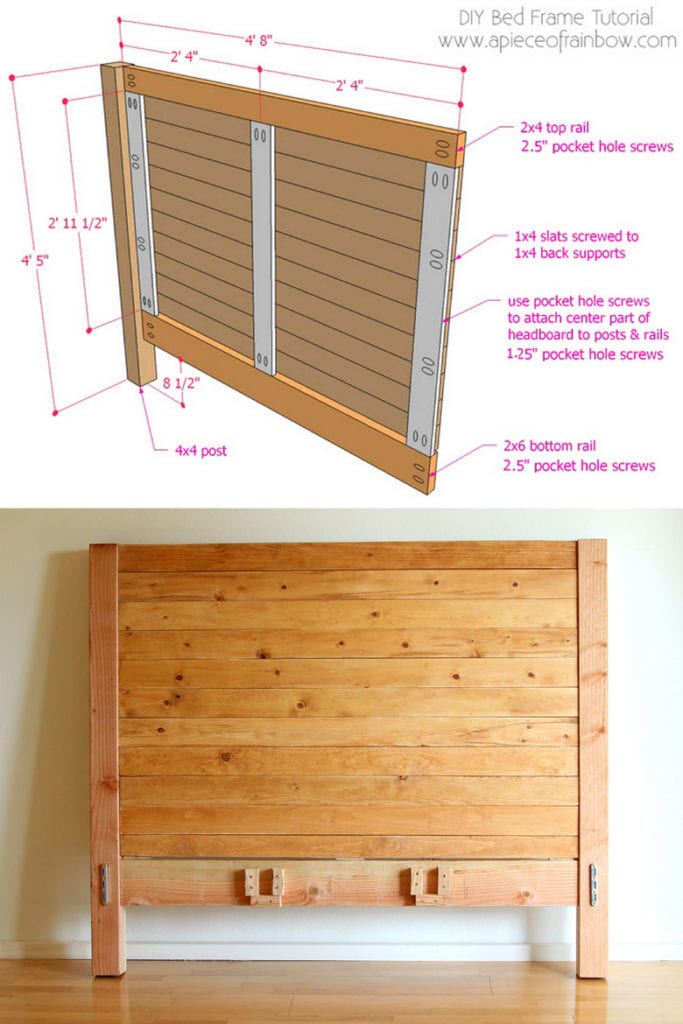
The key is to leave a tiny gap (even 1/32″ is enough ) between the 1×4 slats to allow room for wood movement. More about wood movement in the DIY headboard tutorial here
Instead of making this super long tutorial even longer, I have included detailed step-by-step instructions on how to build the center panel, how to check for square, wood movements, plus other helpful tips in this DIY wood headboard tutorial here.
It also includes variations on how to build a wood headboard like this if you already have a bed frame and just want to add a headboard!
For our DIY headboard, I gave the boards a light gold stain to bring the white pine 1x4s closer in color to the Doug Fir posts and rails, using Recipe #7 in this tutorial: Easy Homemade All Natural Wood Stains with 7 Recipes!

We decided to leave our wood bed frame natural, another good option is a whitewashed wood finish. Here's a detailed tutorial on how to whitewash wood in 3 simple ways-

To build the footboard, use 2.5″ pocket hole screws to attach the 2×6 to the 4×4 posts, check they are flush at top and on the side that faces out.
Because our goal is to keep this DIY bed frame easy to assemble and disassemble when we move, I design it so the bed slats and supporting 2×4 stringers are held in place by supports and spacers, instead of attached to the bed rails.
The key here is to measure carefully so the bed slats are just 1/4″ below the top of the 2×6 side rails. You can have them flush with the top of the 2×6 side rails, we chose the 1/4″ offset for a cleaner look, and 1/4″ does not affect how the mattress sits on top of the platform bed.
The U-shaped slots for the 2×4 stringers are made from 2x2s, screwed onto the 2×6 rails on the headboard and footboard. The 2x4s just slide sideways into the slots. You can also use 2×4 joist hangers like these. Our reader Dan suggested using BOTH wood glue and strong screws to attach the U channels, because they bear a lot of weight. It's a great idea!
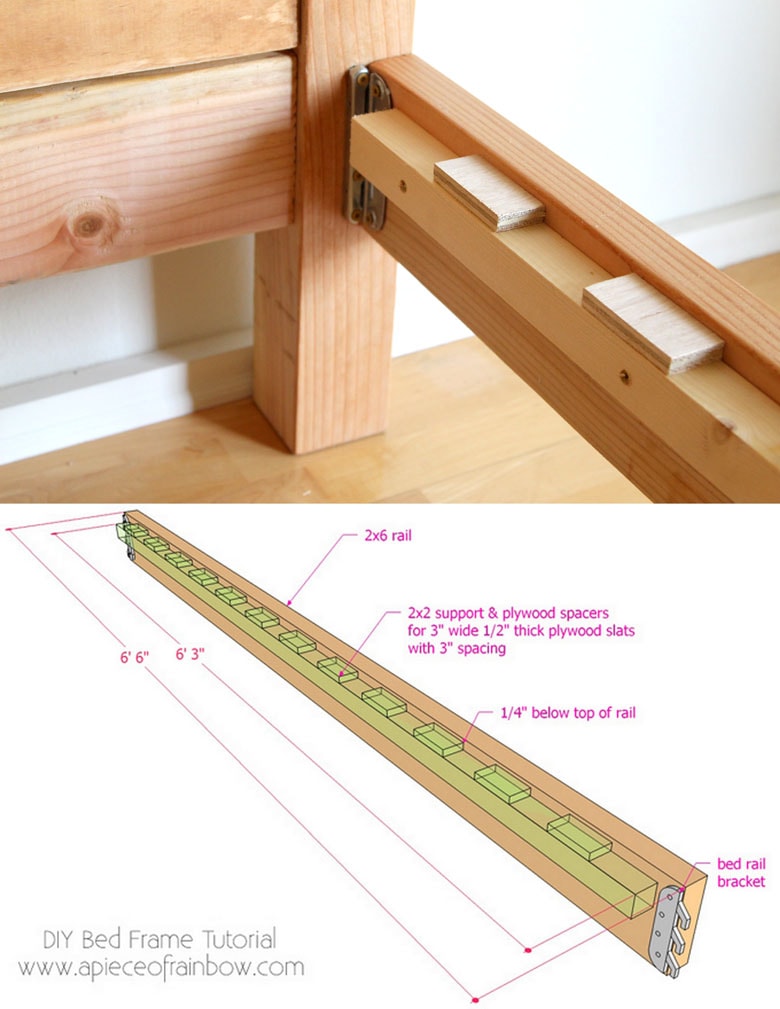
The 3″ wide slats are supported by the 2×4 stringers and 2x2s attached to the side rails with screws. The slats are held in place by 3″ wide spacers cut from one extra slat. The spacers are 3 1/8″ apart for a little wiggle room.
When you glue or screw the spacers onto the 2x2s, line up the two 2×6 side rails, so the spacers are perfectly lined up too. See image above.
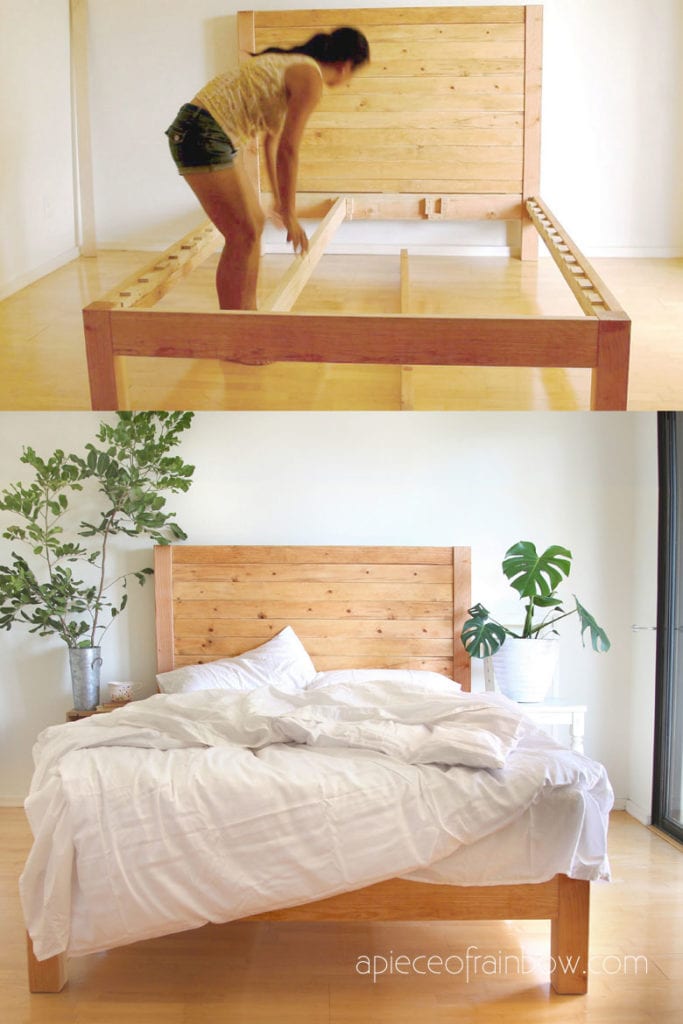
Step 5: assemble the DIY wood bed frame

Time to enjoy the sweet fruit of our labor and assemble our DIY wood bed frame!
First, place the headboard and footboard where you would like the bed to be. Lift the 2×6 side rail and slide the bed rail bracket claws into the slots so they lock in place. Two people can do this pretty easily.
If you have trouble, loosen the screw on the "claw" brackets a little. After the brackets are hooked together, tighten the screws so the bed is sturdy and solid.

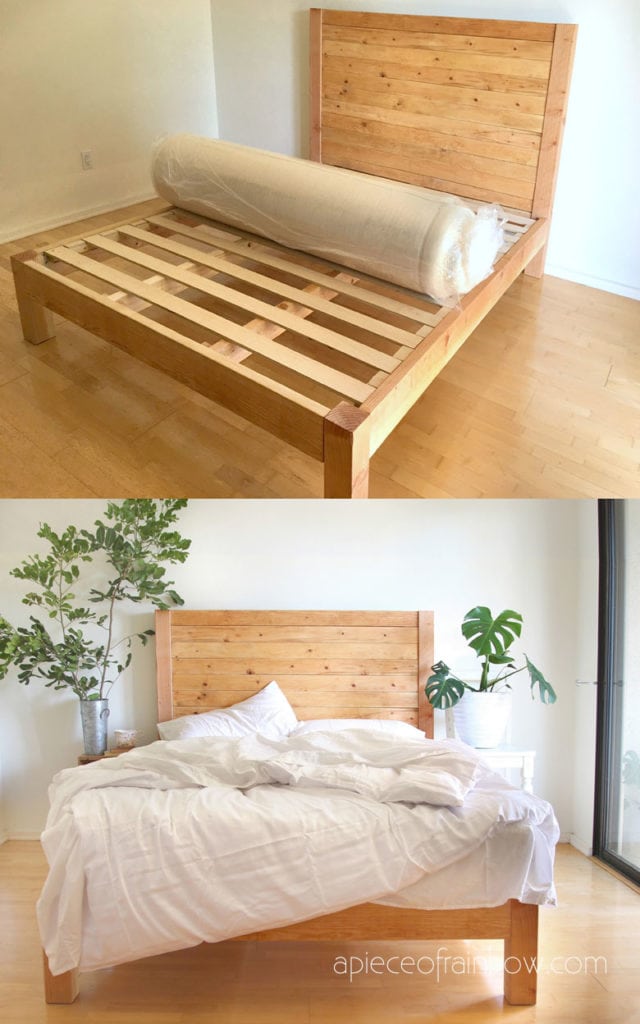
Place the 2×4 stringers sideways into the U-shaped slots on the headboard and footboard. Add the slats. No need for box spring!
Add your favorite mattress and pillows! We LOVE our beautiful mattress made of 100% natural latex foam, organic cotton and wool, and our latex pillows, gifts from Sleep On Latex , a company which has received tons of raving reviews! You can read more about their unique story here.
We can honestly say that when things are made with love and care, they radiate joy into your living spaces. Our bed, mattress and pillows bring smiles to us each day.
Because we are inspired by the amazing book: The Life-changing Magic of Tidying Up, we are adding furniture very slowly and only choosing things that spark joy in us.
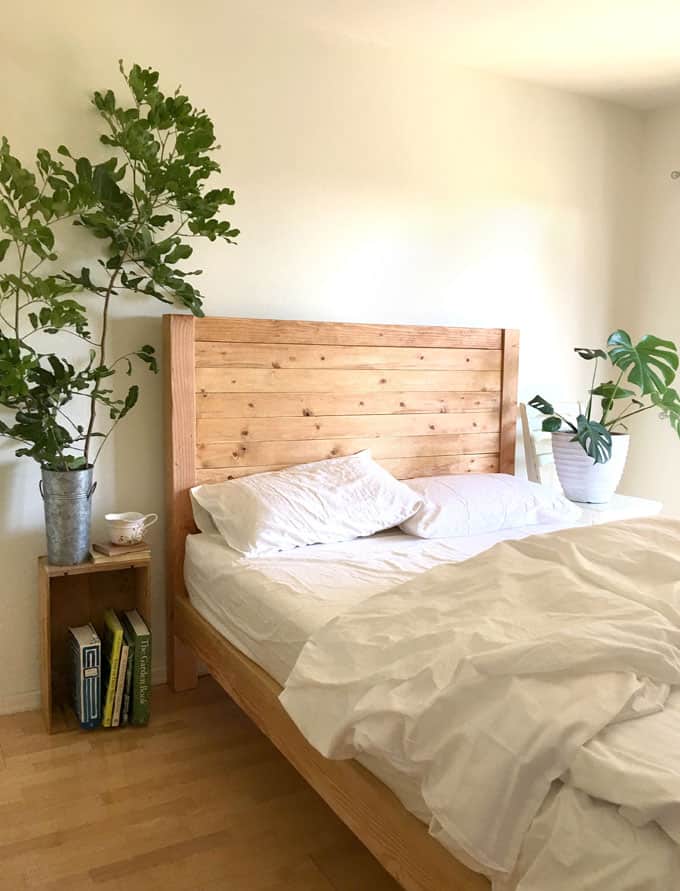
We will build night stands or other pieces at some point, but for now, why not get creative with things we already have and love? A wood crate and a white bar stool can hold a few books, a cup of tea, and some lovely plants. Life is perfect.
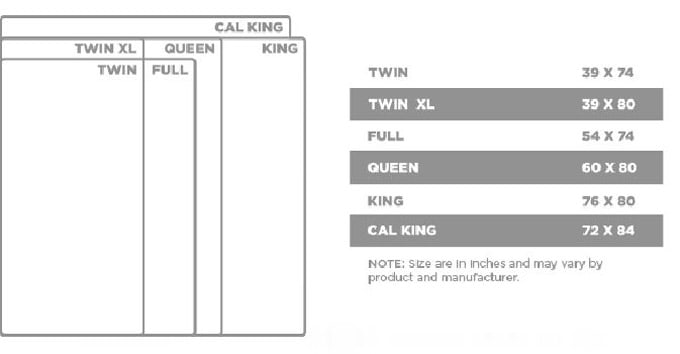
Additional tips: How to adapt this DIY bed frame plan to any size bed, with or without headboard.
This DIY queen bed frame plan can be easily adapted to create other sized beds using the reference chart below.
For example: to build a king size bed frame, just add 16 inches to the length of all the horizontal components: the 1x4s, 2×4 and 2×6 on the headboard, the bed slats, and the 2×6 on the headboard.
To build a twin size bed frame, reduce 21 inches on the length of all the horizontal components: the 1x4s, 2×4 and 2×6 on the headboard, the bed slats, and the 2×6 on the headboard. And reduce 6 inches on the length of the 2×6 side rails and 2×4 stringer ( you only need one stringer because the twin bed is a lot narrower.
To build this DIY bed frame without a headboard, just change the two taller 4×4 posts to the same height as the shorter 4×4 posts, omit everything above, that's it!
Some of you might be wondering if parts of this wood bed frame can be made from pallets. The answer is yes!
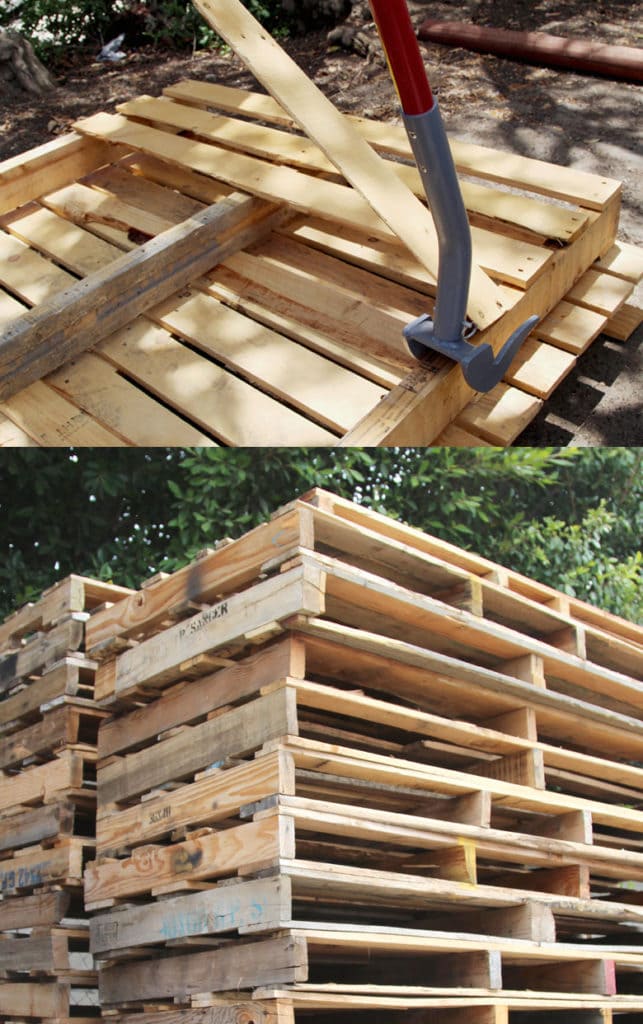
However, not all pallet wood are suitable. Before you start, please check out this detailed guide on where to find and how to work with pallets!
Best natural finishes for your wood bed frame and headboard:
My favorite wood finish is an all natural furniture wax made from bees wax and olive oil. You can get the easy non-toxic wood finish wax recipe here. You can also buy them, these two are both great : a beeswax furniture polish, and a butcher block wood conditioner

I also selected a couple of great DIY bed ideas you can explore – a DIY upholstered bed frame here, an IKEA hack bed frame with storage here, and a pallet bed frame here.
Happy building!
Source: https://www.apieceofrainbow.com/diy-bed-frame-headboard/
0 Response to "Picturs of Things That Are Made of Lumber From the Amazon Pritty and Easy Drawlings"
Postar um comentário